October 5, 2013

Jack-O-Lantern Fruit Cups

It's almost October, so I wanted to share a fun idea for your next Halloween bash! 


For the past few years we've gone to my best friend Brandi's house to celebrate Halloween and go trick-or-treating. She loves to plan out a Halloween-theme menu. 

Fruit-O-Lanterns I

One year she wanted me to make little orange jack-o-lanterns to fill with fruit salad. She found the cute idea online and sent me a picture. To save time instead of carving out the faces, I used black electrical tape to cut out the faces. I started with the traditional jack-o-lantern face, but then I got creative and made other Halloween characters! My favorites were the black kitty, ghost face, and skeleton face that looked like Tim Burton's character Jack. 


Fruit-O-Lanterns II

Since the fruit-o-lanterns were a huge hit with the kids, the following year I decided to make them again! This time I wanted to actually carve out the faces out of the oranges. First I cut the tops off the oranges. Then my husband, Jimmy helped me scoop out all the orange pulp to hollow them out. Then I drew different faces on the outside of each orange and carved out the faces. I used the tiny saw you get in pumpkin carving kits since the oranges were so small. 


If you want a healthy treat for your next Halloween party, try out these Jack-O-Lantern fruit cups! The kids (and adults too) will love them! 

"Retro Gamer" Boys Bedroom

Are you looking for cool way to decorate your boy's bedroom or a playroom?  "Retro Gamer" is what I'm calling our sons' bedroom style.  We have 2 boys, Brendan is almost 8 years old and Carter was just born earlier this year in January.  


When Brendan started to outgrow his baby room, I wanted to design a room with a style that would be cool all the way through his teens.  I thought of things that boys love, such as sports, cars, and video games!  I decided on a Retro Gamer style which brings back fond childhood memories of growing up in the 80's.  My son loves to play video games and my husband still plays video games too, so I think this style could even carry him through his adulthood!
Back to the design, it all started with an old white lamp that I had from college.  The shade was originally white, but over the years it had started to yellow.  The lamp was still working and I didn't want to throw away the lamp, nor did I want to buy another lamp shade.  Upcycling the lamp was the best solution.  

What Is Upcycling?
Upcycling is the process of converting old or discarded materials into something useful and often beautiful.
Upcycle Project: Space Invaders Lamp
I created my own space invaders stencil by finding an image on the Internet that was the right scale for my lamp.  I printed the image and traced it with a fine point sharpie marker onto a stencil sheet.  You can find stencil sheets at your local arts and craft store.  Using an exacto knife and cutting mat, I carefully cut out the images that I just traced.  

Once I had my space invaders stencil made, I played around with where I wanted to trace out the images on the lamp shade before I actually traced them.  I used a ruler as a guide to center my stencil and placement of the images.  Using a pencil, I lightly traced the images onto the lamp shade. 

Next, I painted the space invader images with neon green acrylic paint and and allowed the green paint to dry.  Once dried, I painted the entire shade where there was white showing with black acrylic paint.
(Be very careful painting around the images using a fine paint brush to avoid ugly black smudges) 


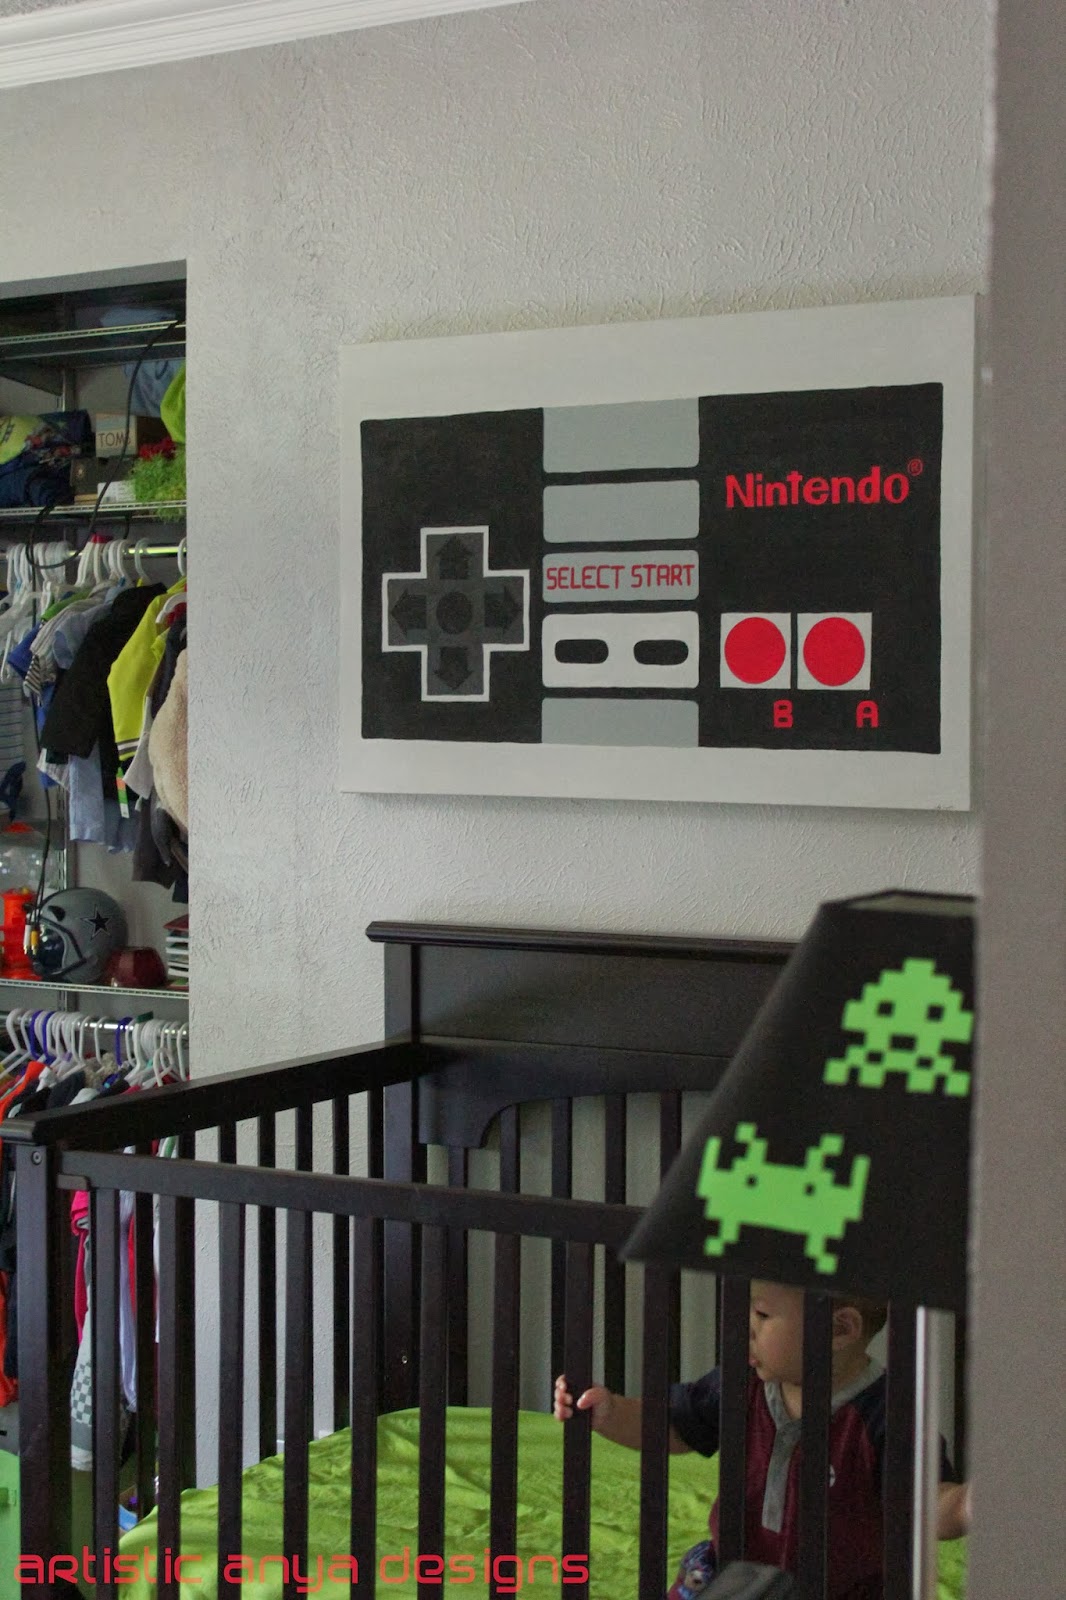
Nintendo Controller Custom Painting

Next project was creating a custom painting for my son's bedroom.  I came up with the idea to paint an old school Nintendo controller to tie in with the Retro Gamer theme. My son Brendan was a few years younger when I painted this art piece and he didn't quite understand when I tried to explain the Nintendo controller was before his time! He now loves this custom and original artwork that I made for him and I really love how my painting turned out!

When I posted the picture of my painting on Facebook, so many people wanted a custom painting for themselves too! The best comment was from my husband and his cousin James, "Be sure to tell him [Brendan] all he needs to know is 'up up down down left right left right B A'" We were cracking up over this, but for those who are too young to know what that means...it was an old cheat code for Nintendo games such as Contra.


Here's a picture of his bedroom furniture before we knew we were expecting baby number 3! We sold the full bed so we could fit a crib and bunk beds.


Using vintage finds such as old license plates and street signs, I wanted to make a unique wall collage.


Faux Vintage Letters

Another project I made to personalize the boys' room was creating faux vintage monogram letters for each of their names.  I found these giant paper mache letters at Jo-Ann fabric and craft store and they were originally a brown color.  When I was painting them using acrylic paint, I tried to create the look of a rusty vintage letter.


Now that the boys have to share a room, I found this lime green and gray bedding for the crib to coordinate with room's existing color scheme. 


Kids grow up so fast, so when you start thinking of how to design your kid's bedroom...think outside the box and also think ahead of how they will grow into the bedroom style.  Have fun with whatever style you choose but consider this Retro Gamer theme for your son's bedroom or playroom!


September 14, 2013

Strawberry Shortcake Party


Are you planning a Berry Special birthday party for your little girl?  Here are some ideas from my daughter's Strawberry Shortcake 3rd birthday party!


It started with my Strawberry Shortcake board that I created on Pinterest.  This was my very first party using Pinterest to gather my ideas.  Pre-Pinterest days, I googled party ideas and compiled a list of links and pictures.  Pinterest has definitely changed the way I plan parties!

I wanted to have colorful and fun party for my daughter's 3rd birthday.  Pink and green is a great color combo for a party theme.  There are plenty of pink and green decorations available at your local party store.  You can save money by using solid color decor and party supplies.  If you have solid color items leftover from the party, you are not stuck with a particular theme.  For example I used solid pink and solid green plastic cups instead of purchasing strawberry shortcake cups.  I was able to use the leftover green cups for my sister's baby shower. 


Strawberry shortcake looked different when I was a little girl.  In my opinion, the newer Strawberry Shortcake is much cuter! I created the custom invitations myself because I didn't see anything at the party store that caught my eye.  I believe that a great invitation can set the tone for what your guests can expect for your party.  The green stripes added that signature strawberry shortcake look, but was a subtle touch instead of putting an actual picture of Strawberry Shortcake. In the dollar section at Michaels craft store, I scored the green, pink and red buttons and the paper flowers too.


Making your own birthday banners are a great way to be cost effective and to add custom details if you can't find one that matches your theme.  Using my Cricut machine I made this strawberry banner using a heart shape, flower shape for the leaves, and cutout the lettering.  I also used a round paper punch for the polka dots.  I saved money by using things I already had in my scrapbook supplies!


Candy/Party favor buffets are great for large birthday parties.  It makes it easier rather than having several individual goodie bags and making sure each bag has the right ratio of toys and candy.  This gives the kids (and adults too!) a fun way to pick what kind of candy and favors they want! As I was planning the party, when I went to several different stores I looked for party favors, colored candy, or containers.  Candy buffets make a huge impact when you stay within a color theme. 


Using crepe paper, I made a colorful and inexpensive backdrop for the candy buffet. I also hung a favor sign that I made that said "Thank you berry much!" 


What better time to make chocolate-covered strawberries, than a strawberry shortcake birthday party!  A friend told me about Dolci Frutta for making chocolate covered strawberries.  It's a microwavable chocolate that you melt, stir and dip your strawberries! So easy and fast! I found it in the produce section at the grocery store.


 I love to bake but after making my first fondant cake here, it gave me new appreciation for bakers who work with this messy goop!  Before I didn't know why it was more expensive for fondant cakes, but now I know why!  Making home-made marshmallow fondant to cover the cake and using a silicone mold to shape the small buttons and bottom border was very time-consuming. Thankfully my best friend Brandi who had taken cake decorating classes before, helped me make this cake.  I would have given up if I didn't have her there to help me. 


 I made strawberry cupcakes with strawberry buttercream frosting (here's the yummy frosting recipe: Sprinkles' Strawberry Frosting)


We hand-shaped the strawberries out of the fondant and they ended up being the perfect little candle holders.


Everyone loved the decorations and the candy buffet, but most importantly my daughter enjoyed celebrating this day with all our family and friends!


Thank you BERRY much for stopping by and hope you come back for more creative ideas! :)

Follow Artistic Anya Designs