September 14, 2013

Strawberry Shortcake Party


Are you planning a Berry Special birthday party for your little girl?  Here are some ideas from my daughter's Strawberry Shortcake 3rd birthday party!


It started with my Strawberry Shortcake board that I created on Pinterest.  This was my very first party using Pinterest to gather my ideas.  Pre-Pinterest days, I googled party ideas and compiled a list of links and pictures.  Pinterest has definitely changed the way I plan parties!

I wanted to have colorful and fun party for my daughter's 3rd birthday.  Pink and green is a great color combo for a party theme.  There are plenty of pink and green decorations available at your local party store.  You can save money by using solid color decor and party supplies.  If you have solid color items leftover from the party, you are not stuck with a particular theme.  For example I used solid pink and solid green plastic cups instead of purchasing strawberry shortcake cups.  I was able to use the leftover green cups for my sister's baby shower. 


Strawberry shortcake looked different when I was a little girl.  In my opinion, the newer Strawberry Shortcake is much cuter! I created the custom invitations myself because I didn't see anything at the party store that caught my eye.  I believe that a great invitation can set the tone for what your guests can expect for your party.  The green stripes added that signature strawberry shortcake look, but was a subtle touch instead of putting an actual picture of Strawberry Shortcake. In the dollar section at Michaels craft store, I scored the green, pink and red buttons and the paper flowers too.


Making your own birthday banners are a great way to be cost effective and to add custom details if you can't find one that matches your theme.  Using my Cricut machine I made this strawberry banner using a heart shape, flower shape for the leaves, and cutout the lettering.  I also used a round paper punch for the polka dots.  I saved money by using things I already had in my scrapbook supplies!


Candy/Party favor buffets are great for large birthday parties.  It makes it easier rather than having several individual goodie bags and making sure each bag has the right ratio of toys and candy.  This gives the kids (and adults too!) a fun way to pick what kind of candy and favors they want! As I was planning the party, when I went to several different stores I looked for party favors, colored candy, or containers.  Candy buffets make a huge impact when you stay within a color theme. 


Using crepe paper, I made a colorful and inexpensive backdrop for the candy buffet. I also hung a favor sign that I made that said "Thank you berry much!" 


What better time to make chocolate-covered strawberries, than a strawberry shortcake birthday party!  A friend told me about Dolci Frutta for making chocolate covered strawberries.  It's a microwavable chocolate that you melt, stir and dip your strawberries! So easy and fast! I found it in the produce section at the grocery store.


 I love to bake but after making my first fondant cake here, it gave me new appreciation for bakers who work with this messy goop!  Before I didn't know why it was more expensive for fondant cakes, but now I know why!  Making home-made marshmallow fondant to cover the cake and using a silicone mold to shape the small buttons and bottom border was very time-consuming. Thankfully my best friend Brandi who had taken cake decorating classes before, helped me make this cake.  I would have given up if I didn't have her there to help me. 


 I made strawberry cupcakes with strawberry buttercream frosting (here's the yummy frosting recipe: Sprinkles' Strawberry Frosting)


We hand-shaped the strawberries out of the fondant and they ended up being the perfect little candle holders.


Everyone loved the decorations and the candy buffet, but most importantly my daughter enjoyed celebrating this day with all our family and friends!


Thank you BERRY much for stopping by and hope you come back for more creative ideas! :)

September 10, 2013

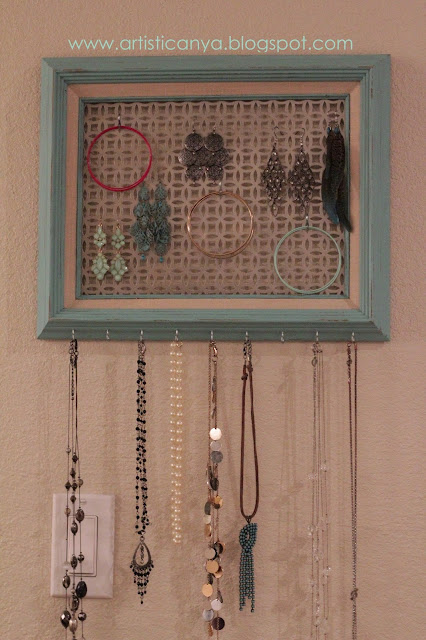
DIY Turquoise Jewelry Holder


    Have you ever struggled to untangle a ball of necklaces stuck together? If you have, you are not the only one my friend.  This tutorial will provide a great way to make a DIY jewelry holder to solve your necklace nightmares! 

    This past July, I called my best friend Brandi to ask her what she wanted for her birthday.  When asking this question, I expected the typical response for birthday gifts, i.e. gift card, dinner, etc...but no, not this year. Brandi says to me, "I want a jewelry holder" and my thoughts are cool...that's easy.  I'll just go and buy a jewelry holder at the store.  Then she adds, "and I want you to make it."  I was caught off guard and was not expecting this at all.  I tried to suggest that I could buy a jewelry holder, but she insisted that I had to make one.  *Sigh*  I was thinking to myself that I have never made a jewelry holder, let alone know where to start.  So of course, I start gathering ideas on Pinterest. 

    I already had some wooden frames that I bought at garage sales that were collecting dust.  My plan was to use one of my larger 16 x 20 frames for this project as a starting point.  I headed to Hobby Lobby (with all 3 of my kids).  Yes, I take them everywhere...and it's not easy.  As I combed thru the store searching and trying to figure out what I wanted to do, I came across a pre-made jewelry holder.  I was so tempted to buy it, but I didn't. So I ended up not finding anything that worked for my project there.

    Next stop, was Home Depot (a home improvement store) to find decorative metal sheets.  I saw the idea on HGTV where designers use these decorative metal sheets to inlay in cabinet doors or radiator covers. There were also ideas on Pinterest that I had seen using metal sheets as well.  So again with my 3 little sidekicks, we searched for these metal sheets.  (Keep in mind when shopping with my kids, someone ALWAYS has to use the restroom. So a quick trip to the store, is never quick!)  We finally found them after asking about 3 different associates.  They had 2 different sizes and I didn't pre-measure the frame before I left the house. They have different finishes and patterns to choose from as well. I bought the smaller size sheet thinking this would work.  When I got home ready to start working on this project, the width of the metal sheet was too short.  After my exhausting shopping day, the last thing I want to do is think about going back to the store to return something.  Thankfully I had a smaller 9 x 12 frame that I decided to use instead.

List of supplies that I used:

-Wooden 9 x 12 Frame (Garage sale find)
-Decorative Metal Sheet (Home Depot)
-Small Metal Hooks
-Small "S" hooks
-Acrylic Paint/Paintbrush  (I mixed several colors to make the turquoise, but any color you prefer)
-Clear Acrylic Spray Sealer
-Sandpaper
-Blue Painters tape (you may not need this if you are painting the entire frame)
-Pliers
-Measuring tape
-Hammer
-Staple gun/staples
-Wire Cutters (I started to use, but ended up not really needing these...I'll explain later)


Step 1:  Take wooden frame and lightly sand the entire frame to remove finish to help paint adhere

Step 2:  Measure where you want to place the bottom hooks.  I started from the middle and measured outward.  Once I decided where I wanted to place my hooks I made tiny holes to mark each place.  I screwed the hooks by hand and just twisted them into the wood.  I didn't tighten them all the way in the wood at this point.  


Step 3:  Since the frame I was using had a decorative fabric inlay, I had to use the blue painter's tape to tape off the cream area.  (This step isn't necessary if you are painting the entire frame one color.)


Step 4:  Paint the entire frame with acrylic paint.


Step 5:  I decided to remove the hooks before I started painting the outer area of my frame. Paint the frame and allow for the paint to dry before proceeding to next step.  Spray the frame with a coat of clear acrylic sealer to protect it.


Step 6:  Measure the decorative metal sheet for the amount needed to fit inside the frame with a little extra to allow for staples. Since the frame was 9 x 12, the width of the metal was already 12" so luckily I just needed to make one cut.   I started to use wire cutters but it got pretty sharp as I cut towards the middle.  (So I thought to myself, do I risk cutting myself for all this?!)  Then I thought of a good idea, if I bend metal enough...it will eventually break. My plan worked and the metal snapped in half where I had bent the sheet back and forth.


 Step 7:  Using pliers and a hammer, bend the metal to fit inside the frame for a snug fit.  Then use a staple gun to secure the metal sheet to the backside of the wooden frame.  You may have to use the hammer like I did, to get those finicky staples more secure. 


Step 8: Screw the small bottom hooks back into the holes you had already made.  Lightly Sand the edges and corners of the frame with sandpaper to rough up the edges.  I like the look of worn chipped off paint.  Then sit back and admire your handy work! :)


I was pretty proud of myself after doubting my ability to do this project! I hung it up right away to test it out.  Using the small "S" hooks, you can hang bracelets. and the bottom hooks were perfect for hanging necklaces. 


Brandi really wanted a solution to her problem of tangled necklaces she battled with each morning while getting ready for work.  So now she got her birthday wish which solved her problem (she loved it!) and I gained a bit more confidence in my carpentry skills!  Birthday gifts should be made with love or come from the heart, and this certainly was a gift both her and I will remember and cherish!

September 8, 2013

Alligator Themed Baby Shower


My sister Laura is due in October this year with her first baby.  I can't wait to meet my little nephew Zain. 
Having 3 kids myself, my sister has given me three awesome baby showers (I'll probably post some of those baby showers later). Given that, I wanted to make this day very special for Laura.  Her best friend Michelle and I hosted an Alligator themed baby shower.  The shower theme was inspired by her nursery and colors- navy, white and green. 

When Michelle and I started planning the shower, I created a secret board in Pinterest to gather my ideas.  For those who are not familiar with what Pinterest is, you need to get on that right away.  The secret board was a perfect way to be able to plan a shower without my sister seeing all the details and ideas since she follows my Pinterest boards. One day when I logged into Pinterest on my computer, I was invited to pin on another person's fashion board.  This was mind-blowing.  So I decided to try this and invite Michelle to pin on my Baby Shower Idea board...and it worked!  This was a great way for both us to collaborate our ideas that we pinned so we can visually see what we wanted to do for the shower.  Don't you just love Pinterest?!

As I was searching for ideas on Pinterest, I found an idea for red, white, and blue painted mason jars from It All Started With Paint with a great tutorial. I wanted to use this idea for my sister's baby shower but instead of red stripes painting the mason jars navy and white stripes.  I just adore how cute these turned out! 
Painted Striped Mason Jars
I found these wide mouth mason jars at Hobby Lobby (one of my favorite stores).  You can use regular size mason jars, but I wanted to be able to fit more utensils and straws. The chevron paper straws were also from Hobby Lobby. Using acrylic paint I already had at home and some painter's tape; I started my first baby shower project.  The tutorial suggested using washi tape and that probably would have been better to use but I already had the blue painters tape. When I pulled off the painters tape, it took chunks of the paint off and I had to meticulously retouch the paint stripes.  Once the paint completely dried, I used sand paper to rough up some areas. I focused removing the paint on the words to make them stand out and removed paint here and there to make it look more rustic. 

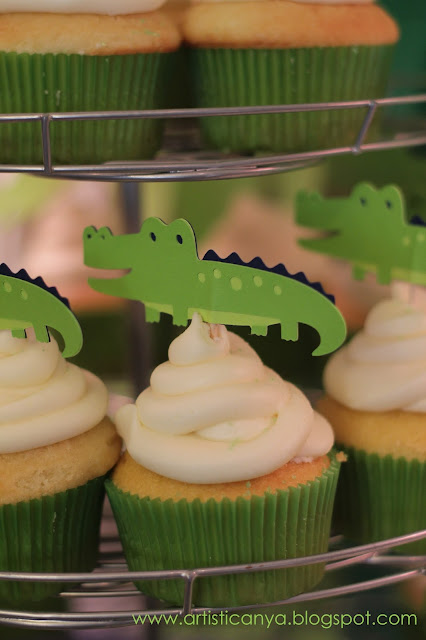
 There isn't a whole lot of alligator baby shower party decorations to buy at stores; so my only option was to make all the custom décor myself. For my next project I wanted a banner so I created this "It's A Boy" Pinwheel Banner.  Using my handy-dandy Cricut machine I also made alligator cupcake toppers 

Pinwheel Banner and Alligator Cupcake Toppers

Pinwheel Banner:
  1. Start by making the pinwheels with navy and white card stock paper. 
  2. Cut circles out in different patterns of scrapbook paper (the chevron, striped and crocodile paper I used was from Hobby Lobby).
  3. Cut the letters out using the "Cindy Loo" Cricut cartridge with my Cricut machine. 
  4. Then I cut out 2 different sizes of alligators with the "Create a Critter" cartridge (I thought it would be cute to make one mama alligator and one baby alligator for each side of the banner).  The alligators are attached using foam dots to give them more dimension.
  5. Punch 2 small holes towards the top of the pinwheels to string ribbon through. I tied knots after each pinwheel section to space the pinwheels evenly and to keep them from sliding down.


For the cupcake toppers, I cut out small alligators and glued the toothpicks in between the layers of paper.   


Pinwheel Collage
My Tita (aunt) Ady created these beautiful floral arrangements for the baby shower.  She even used some branches right from my own backyard!


Michelle baked these delicious vanilla buttercream cupcakes and we finished them off with the alligator toppers!


Alligator Cupcake Toppers
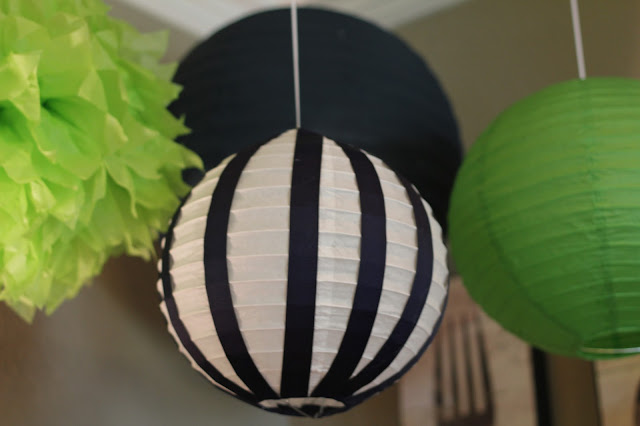
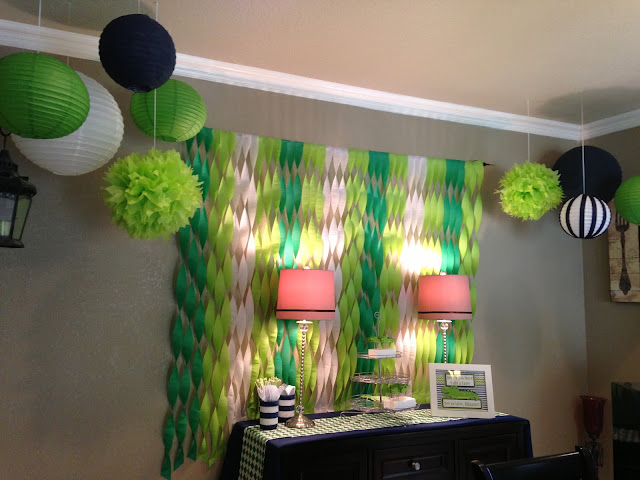
My sister already had these small and large white paper lanterns from her wedding.  To add more navy, I painted the large lantern with navy acrylic paint and I glued navy ribbon to the smaller white lanterns.  


We wanted to incorporate the theme even in the drinks, so I made these beverage signs "Swamp Water" Sweet Tea and "Gator-ade" Lemonade.


Twisted Crepe Paper Backdrop 


To thank all our guests, Michelle baked some chevron sugar cookies and I created this fun sign to send them on their way!  

Party Favor Sign- "Before You Leave Take a Favor...See Ya Later Alligator!"

You can now order this alligator favor sign through my Etsy Store! ArtisticAnyaDesigns Etsy Shop

Click here to order on Etsy

Chevron Sugar Cookies
For the shower I HAD to color coordinate my outfit of course and my kids too! Look how cute my sister's little baby bump is!  I love my sister so much and hope she loved the shower as much as I enjoyed planning it for this special day! 


**Extra special thanks to Michelle and my Tita Ady for helping me pull all this together too!**

Since I'm brand new to the blogging world, stay tuned for more parties, crafts and DIY projects!  Thanks for stopping by! :)


Follow Artistic Anya Designs